Array configuration
Unraid's storage system combines flexibility with data protection through its array and cache architecture. The array manages your primary storage with optional parity protection, while cache pools accelerate performance.
Below are some important array configuration principles:
🛡️ Always use your largest drive(s) for parity.
When you add more disks to your array later, remember that you can't use a data disk that's larger than your parity disk(s). It's a good idea to buy the biggest hard drive for your parity disk at the start. This way, you won't be limited by smaller sizes when expanding later.
If you use two parity disks, they can be different sizes. However, keep in mind that no disk in your array can be larger than the smallest parity disk you have.
⚠️ Understand that SSDs perform well but may have compatibility issues.
When using SSDs (solid-state drives), it's important to know that they may have compatibility issues due to features like TRIM and Discard. While using them for data storage or parity could lead to some unexpected issues, the cache or cache pool is generally not affected. However, most modern SSDs, including NVMe, should work well in your system.
⚡Using a cache will improve array performance.
Instead of writing directly to the main storage, data is first sent to a dedicated disk or a group of disks. This data is then moved to the main storage at scheduled times, usually once a day at 3:40 AM. The great thing is that data saved to the cache still appears through your user shares, so you don’t have to change how you access your files.
🔄 Creating a cache-pool helps keep your cached data safe.
If you only use one cache device, any data on it before it's moved to the main storage can be at risk of loss. To ensure your data remains protected at all times, both on the main storage and the cache devices, it's important to use more than one device for caching. This setup is known as a cache-pool. You can also expand cache pools as needed, just like you can with your main storage array.
🚀 SSD cache devices are great for apps and virtual machines.
Using SSDs helps applications and virtual machines (VMs) run faster because they can access data more quickly. SSDs work well in a cache pool, giving you an excellent mix of speed, efficiency, and data security.
🔒 Encryption is turned off by default.
If you want to use encryption on your system, you can enable it for specific devices. Just click on the disk you want to encrypt and change the file system to one of the encrypted options available. Keep in mind that using encryption can make it harder to recover data if something goes wrong, so only use it if you really need it.
Unraid identifies disks based on their serial numbers and sizes, not the specific SATA ports they're connected to. This means you can switch drives between different SATA ports without affecting their assignments in Unraid. This feature is particularly useful for troubleshooting hardware problems, like finding a faulty port or replacing unreliable power or SATA cables.
Your array will not start if you assign or attach more devices than your license key allows.
Start/Stop the array
When your system starts up, it usually powers up the array of disks automatically. However, if you've recently changed the disk setup, such as adding a new disk, the array will remain off to allow you to check your configuration.
Keep in mind that you'll need to stop the array first to make any adjustments. Stopping it will pause all applications and services, and your storage devices will be unmounted, making your data and applications inaccessible until you restart the array.
To start or stop the array:
- Open a web browser and log into the Unraid WebGUI by entering
http://tower(orhttp://tower.localon a Mac)noteThis address will vary based on on how you named your server when you first configured Unraid.
- Click on the Main tab.
- Navigate to the Array Operation section.
- Click Start or Stop. You may need to check the box that says "Yes, I want to do this" before proceeding.
Array operations
Unraid provides several maintenance and configuration options for your storage array. Key operations include:
📄️ Add Disks
Expand storage capacity
📄️ Replace Disks
Upgrade or swap failed drives
📄️ Remove Disks
Decommission or reduce array size
📄️ Check Disks
Monitor SMART data and diagnostics
📄️ Spin Control
Manage disk spin-up/down
📄️ Reset Config
Rebuild array structure
Adding disks
Setting up new disks
- Go to Main > Array Devices in the interface.
- Pick the slot where you want to add the disk and select the disk from the dropdown list.
- Choose the File System you want to use (XFS or BTRFS is recommended for best performance).
If you're using modern Unraid-compatible hardware, you can change disks without shutting down your server. This feature, known as hot-swap, has been available in LimeTech servers since the beginning.
Clear vs. Pre-Clear
Unraid requires disks to be in a cleared state - completely filled with zeros and marked with a special signature - before adding them to a parity-protected array. This process ensures parity integrity and keeps the array online during disk preparation.
Clearance is mandatory when adding a data disk to a parity-protected array. If you are adding a parity disk or working with an array that does not use parity, clearance is not required.
The built-in clear operation writes zeros to the disk in the background, allowing the array to remain available. Once the process is complete, the disk must be formatted before use. This method is efficient, requires no third-party tools, and is ideal for quick expansions.
For a more thorough approach, the pre-clear operation - available through plugins like Unassigned Devices Preclear - performs a pre-read to check for bad sectors, zeros the disk, and then verifies integrity with a post-read. This extra step helps detect early drive failures but takes significantly longer and requires manual plugin installation.
In summary, use the built-in clear operation for fast additions to your array, or choose pre-clear if you want extensive testing of disk health before putting a drive into service.
Clear vs. Pre-Clear Comparison
| Clear | Pre-Clear | |
|---|---|---|
| Purpose | Ensures basic compatibility | Tests the drive and prepares it for use |
| Speed | Works quickly | Much slower process |
| Array Impact | Runs in the background | Needs the disk to be removed from use |
| Best For | Ideal for quick expansions | Great for checking new drives |
Clear quickly prepares a disk for use, making it compatible with your system and allowing you to add storage in just a few hours.
Pre-Clear takes longer but provides a thorough test, ensuring a new disk is reliable before it becomes part of your array.
Avoid formatting a pre-cleared disk before including it in the array, as this removes the clearance signature.
Adding data disks
Adding data disks is a great way to increase your Unraid array's storage space. By adding more disks, you can keep more files, applications, and backups, while still protecting your data.
When adding a new data disk, it must be the same size or smaller than your current parity disk. If you want to use a larger disk, you’ll need to replace the parity disk first with the larger one, then use the old parity disk as a data disk.
How to add a data disk
- Standard addition (Parity-protected)
- Addition without parity
To add a data disk to a parity-protected array:
-
Stop the array: Use the Unraid WebGUI to stop the array.
-
Turn off your server: Power down your server safely.
-
Install the new hard drive(s): Add the new disk(s) physically.
-
Power the server back on: Start your server again.
-
Assign the new disk(s): Use the WebGUI to assign the new disks to available data slots.
-
Start the array: Start the array again.
- Unraid will automatically start a Clear operation on the new disk. This fills the disk with zeros and ensures it’s ready for use while maintaining data integrity.
- The clear operation takes place in the background, so you can still access your array. However, the new disk won’t be usable until the process is complete and the disk is formatted.
- If you’ve pre-cleared the disk, Unraid will skip this step, recognizing that it’s already ready to use.
-
After Clearing Completes: Once the clearing process is finished, the disk will show up as unmountable in the WebGUI. You'll be prompted to format it.
importantAlways double-check the serial number to make sure you’re formatting the right disk. Formatting will erase everything on that disk, and this action cannot be undone.
-
Confirm the Format: Check the confirmation box and click the Format button. Unraid will give you a warning about the outcomes of this action.
-
Formatting Process: The formatting will take a few minutes. Once it's completed, the disk will show as mounted and ready for use. It's normal to see a small amount of used space due to file system overhead.
You can add multiple disks, but they won’t be usable until all of them have been cleared and formatted.
To add a data disk to an array without parity protection:
-
Stop the array: Use the Unraid WebGUI to stop the array.
-
Turn off your server: Power down your server safely.
-
Install the new hard drive(s): Add the new disk(s) physically.
-
Power the server back on: Start your server again.
-
Assign the new disk(s): Use the WebGUI to assign the new disks to available data slots.
-
Start the array: Start the array again.
- The clearing step is skipped entirely when there is no parity disk in the array.
-
Format the Disk: The new disk will show up as unmountable in the WebGUI. You'll be prompted to format it.
importantAlways double-check the serial number to make sure you’re formatting the right disk. Formatting will erase everything on that disk, and this action cannot be undone.
-
Confirm the Format: Check the confirmation box and click the Format button. Unraid will give you a warning about the outcomes of this action.
-
Formatting Process: The formatting will take a few minutes. Once it's completed, the disk will show as mounted and ready for use. It's normal to see a small amount of used space due to file system overhead.
You can add multiple disks, but they won’t be usable until all of them have been formatted.
Adding parity disks
Parity disks are a helpful feature that provide an extra layer of protection for your data. They allow your storage system to recover information if a hard drive fails. While using parity disks is optional, it’s highly recommended to keep your data safe.
- Single Parity: The disk must be at least the same size as your largest data drive.
- Dual Parity: Both parity drives must also be at least the size of your largest data drive, but they can be different sizes from each other.
Adding a parity disk is similar to adding a data disk, but there’s one important step to keep in mind:
- After you select the parity disk and start your storage array, a process called parity calculation begins.
- While this process runs, you can still access your files. However, the system might run a bit slower because it’s working to calculate the parity.
Crucial: Don’t try to add parity and data disks at the same time.
Always, separately:
- Add your parity disk(s) and allow the system to rebuild the parity.
- Add your data disk(s) and proceed to clear or format them.
Upgrading parity disks
You can upgrade your parity device(s) to a larger one(s) to use larger-sized disks in the array or add an additional parity drive.
If you're planning to take the following steps and only have one parity drive, keep these points in mind:
- Your data will be unprotected until the parity rebuild is complete. If a data drive fails during this time, you could lose the information on that drive.
- If you already have a data drive that has failed, proceeding with these steps will prevent you from being able to rebuild that drive. In this case, you should follow the Parity Swap procedure instead.
To remove a parity drive:
-
Stop the array: Use the WebGUI to stop the array.
tipStopping the array first, you can skip steps 2 and 4 in this list.
-
Power down the server: Turn off your server to safely make hardware changes.
-
Install the new parity disk: Place the new, larger parity disk into your server.
-
Power up the server: Turn the server back on.
-
Assign the new disk: Go to the parity slot in your settings and assign the new disk, replacing the old one.
-
Start the array: Use the WebGUI to start the array again.
Once the array is back up, Unraid will start building parity on the new disk. You can still access your data during this time, but keep in mind that it might be a bit slower until the process is done. Once the parity build is complete, your data is protected again!
-
Keep the old disk: Don’t remove the old parity disk until the new parity build finishes. If a data disk fails during the upgrade, having the old disk might help you recover your data.
-
Dual parity users: If you have two parity disks, upgrade one at a time for added safety.
-
Repurpose the old disk: After the upgrade, you can use the old parity disk as a data disk if it still meets your storage needs.
Replacing disks
You may need to replace disks in your array for two main reasons:
- Capacity Upgrade: Your storage is nearly full, and you want to use larger disks.
- Failure or Retirement: A disk has failed or is no longer supported.
While the process for replacing disks is similar in both cases, be cautious, as there is a risk of data loss during the replacement. Parity devices help protect your data; one parity device can safeguard against a single disk failure, while two can protect against losing data if two disks fail. Always be aware of your protection level during disk replacements.
Upgrading capacity
When upgrading your data drive to a larger one, here are some points to keep in mind:
-
Unmountable Disks: Fix any unmountable disks before upgrading. An unmountable status won't be resolved during the rebuild.
-
Single Parity Risks: If you have single parity, you're at risk of data loss if another drive fails during the upgrade. Seek advice in forums if this happens.
-
Dual Parity Protection: With dual parity, you’re safe from losing data if one drive fails while upgrading a single drive. You can also upgrade two drives at once, but note that this increases the risk since you won't have protection against another drive failing.
-
Backup the Old Disk: Keep the original disk intact until the upgrade is confirmed successful. This provides a fallback option if anything goes wrong.
Replacing drives always involves some risk. If another drive fails during the upgrade, especially with only single parity, you may experience data loss. Always check the health of your drives before beginning the process, and ensure that you keep the old drive intact until the upgrade is complete and your data is confirmed to be safe.
To upgrade an existing data disk:
-
Run a parity check: First, ensure the integrity of your data by running a parity check. Go to Tools > Parity Check and make sure there are zero errors. If parity isn’t valid, rebuilding the disk will corrupt its file system.
-
Stop the array: Next, you'll want to stop the array. Navigate to Main > Array Operation and select Stop.
-
Unassign the target disk: Once the array is stopped, find the disk you want to replace. Remove it from its slot in Main > Array Devices.
-
Start the array: Now, start the array again. Unraid will emulate the missing disk using the existing parity and data disks. You have two modes to choose from:
- Maintenance Mode: This mode prevents any writes to the emulated disk.
- Normal Mode: If you need read/write access to the emulated disk, select this option.
-
Stop the array again: The array should now show that the unassigned disk has failed. Stop the array once more.
-
Assign the replacement disk: Insert your new, larger disk into the vacant slot in the array.
-
Start the array to rebuild: Finally, start the array again. Unraid will now rebuild the contents of the emulated disk onto the new disk. The file system will automatically adjust to take full advantage of the larger disk’s capacity.
Replacing failed/disabled disks
What is a Failed/Disabled disk?
A failed or disabled drive (disk) is one that Unraid has stopped using for writing data, usually because it encountered a write error. Keep in mind these don't always mean the drive itself is broken; sometimes, it might be due to bad connections, power issues, or just a temporary glitch.
Some indications include:

This red "X" shows which disk needs replacement.

Keep an eye out for these alerts.
Here’s how different parity configurations handle disk failures:
| Failure Scenario | No Parity | Single Parity | Dual Parity |
|---|---|---|---|
| 1 Disk Failure | Data Lost | Rebuildable | Rebuildable |
| 2 Disk Failures | Data Lost | Data Lost | Rebuildable |
- For Single Parity: It's best to replace one disk at a time. If another disk fails during the rebuild, you could lose data.
- For Dual Parity: You can replace one or two disks at the same time, but be cautious if more than two disks fail.
If you experience a situation where more disks fail than your parity can protect:
- Immediately halt all write operations to prevent further data loss.
- Seek help by posting your issue in the Unraid Forums along with diagnostics.
- Do not attempt a rebuild until you’ve received advice - focus on salvaging your data first.
How to diagnose the issue
To diagnose the issue, start by checking the syslog and SMART reports:
- If the syslog shows that the drive has reset, there might be a problem with the connection or cables.
- SMART reports can help assess the drive’s health, but the best way to check is by running a SMART extended test. If it completes without errors, the drive is likely fine.
- If you see CRC errors, it usually points to issues with the cabling. Keep an eye on these errors, as they accumulate over time and don’t reset.
To stay informed about drive issues, enable notifications in Unraid. This way, you are alerted right away if something goes wrong, reducing the risk to your data.
What is emulation?
When a drive is disabled, Unraid will use its parity and other working drives to emulate the failed drive. This means your system continues to operate, and you can still access the data stored on the emulated drive:
- Unraid will stop writing to the physical drive, and any updates will be saved in parity and the emulation instead.
- Before replacing the failed drive, you can check and recover data from the emulated drive, which keeps the physical drive intact for potential recovery.
- If you can't access the emulated drive, repairing the file system is essential before any rebuild since fixing the file system is quicker and more effective than a rebuild.
Preparing for drive replacement
When you need to replace a drive, make sure the new drive is at least as large as the failed drive but not larger than your smallest parity drive. If you have to use a larger drive, follow the Parity Swap procedure.
While it’s not mandatory, many users choose to pre-clear new drives to test them and help prevent early failure. You can do this with the Preclear plugin, a SMART extended test, or manufacturer tools.
If you try to rebuild using an unmountable emulated drive, the new drive will also become unmountable. Always repair the file system before attempting a rebuild.
Normal replacement
A normal replacement means swapping out a broken disk with a new one that’s not bigger than your current parity drives. This keeps your data safe while restoring the full functionality of your system.
Make sure that Unraid can access all the disks to rebuild the missing one. Resolve any disk problems before starting the replacement to prevent losing data.
Always fix any disk errors or warnings before you begin. You need to read all disks accurately for the recovery to succeed.
To perform a normal replacement:
- Stop the Array: Use the Unraid WebGUI to stop the array.
- Power Down Your Server: Turn off your server completely.
- Replace the Failed Disk: Take out the broken disk and insert a new one. Make sure the new disk is equal to or larger than the failed disk but not larger than your smallest parity disk.
- Power Up the Server: Turn your server back on.
- Assign the New Disk:Go back to the WebGUI and assign the new disk to the system.
- Confirm Your Action: Check the box that says: Yes, I want to do this to confirm.
- (Optional) Choose Maintenance Mode: You can select Maintenance mode for a quicker rebuild without any array access. If you do this, click Sync to start the rebuild process.
- Start the Rebuild: Click Start to begin rebuilding. Unraid will copy the data from the emulated disk onto your new disk. If your new disk is larger, Unraid will automatically adjust the space.
If Unraid asks you to format the new disk, do not do it. Formatting erases all data and makes recovery impossible.
- The rebuild depends on reading data correctly from all other disks. If there are any read errors, they can cause more problems.
- If the new disk has been used before, clear any existing partitions before you assign it to avoid issues.
- The rebuild process won’t change the disk’s file format; it restores the previous format.
- If the emulated disk has file system issues and is unmountable, the rebuilt disk will also be unmountable. Make sure to fix any file system problems before starting the rebuild.
Rebuilding a disk
When a disk in your Unraid system fails or needs replacement, rebuilding that disk is crucial to restore your data. This process takes the information from your remaining disks and a special parity disk to reconstruct what's on the failed drive.
Before you begin, it's essential to check the health of your disks. Use SMART reports to verify that all other disks are healthy. If you try to rebuild with a failing disk, you risk losing data.
Always check the health of every disk before starting a rebuild. Rebuilding with damaged disks can lead to data loss.
To rebuild a disk:
- Stop the array:
- Open the Unraid WebGUI.
- Select the option to stop the array, which must be done before making any changes.
- Replace the failed disk:
- Physically remove the damaged or failed disk from your system.
- Insert a new, healthy drive that meets the size requirements of your original disk.
- Reassign the new disk: In the WebGUI, you'll need to designate your new disk in the correct slot where the old disk was located. Look for an option that lets you assign disks.
- Start the array: Go back to the WebGUI and start the array. At this point, Unraid will start the rebuild process automatically.
- Monitor the rebuild: Keep an eye on the progress in the WebGUI. While the array is rebuilding, you’ll still be able to access your files, though the system may be a bit slower than usual.
The time it takes to rebuild can vary widely. It might take several hours depending on the size of the disks and how busy the system is. Larger disks will take longer to rebuild.
- Do Not Format: If Unraid asks you to format the new disk during the rebuild, do not click on format. Doing so would erase all your data and make it impossible to recover.
- File System Format: Once the rebuild is complete, your new disk will have the same file system format as the original disk.
- File System Issues: If the disk you replaced was unmountable due to file system corruption, the rebuilt disk may also be unmountable. In that case, repair the file system before trying to rebuild.
Parity swap
- What is Parity Swap?
- When to Use Parity Swap?
A parity swap is a special procedure in Unraid used when you need to replace a data disk with a disk that is larger than your current parity drive. The process moves your current parity drive to the data slot, then installs a new, larger disk as the new parity drive. This ensures your array remains protected and allows for larger data drives in the future.
Use a parity swap when your replacement data drive is larger than your current parity drive. This is not necessary if your new data drive is the same size or smaller than your parity drive.
Example scenario:
You have an Unraid setup with a 2TB parity drive and a 1TB data drive and want to replace the 1TB drive with a 4TB drive.
First, assign the new 4TB drive as the parity drive, which will replace the 2TB drive. Then move the original 2TB drive to the data slot, and remove the 1TB drive entirely.
After these changes, you’ll have a 4TB drive as your new parity, ensuring you can add future data drives up to 4TB. The 2TB drive will now hold your existing data, while the 1TB drive can be repurposed.
This swap keeps your data secure and your array protected, allowing for future upgrades. Always check Tools > New Config > Confirm before starting, and monitor the rebuild in Main > Array Operation.
- Before starting, ensure the data drive you want to replace is disabled. If the drive has failed (shows a red indicator), it is already disabled. If the drive is healthy but you want to replace it, unassign the drive and start the array once without it to force Unraid to mark it as disabled.
- If your replacement data drive is not larger than your parity drive, use the standard Replacing a Data Drive procedure instead.
- This procedure is only needed for replacing data drives in an Unraid array with a disk larger than the current parity drive. If you only need to upgrade your parity drive, simply remove the old parity drive, add the new one, and start the array. Parity will rebuild automatically.
- Always verify the health of all drives using SMART reports before starting a parity swap. Attempting this procedure with another failing or unhealthy disk increases the risk of data loss.
- Preclear the new disk if possible. While not required, preclearing stress-tests the drive and reduces the risk of early failure.
- Correctly identify all drives before beginning. Note the model numbers and last four characters of each serial number to avoid mistakes during assignment.
To carry out a parity swap:
If the drive to be replaced is already disabled (failed), you may not need to perform steps 1–4. If you have already installed the new replacement drive (for example, after preclearing), you can skip steps 5–8.
- Stop the array if it is running.
- Unassign the old data drive if it is still assigned. If the drive was previously healthy, you may see error notifications for a missing drive - this is expected.
- Start the array. If prompted, check the box confirming your action. The data drive should now show as "Not installed."
- Stop the array again. At this point, the array treats the drive as failed.
- Power down the server.
- (Optional) Remove the old drive. You may wish to keep it installed for testing or reassignment.
- Install the new drive. Pre-clearing is strongly recommended, but formatting is not needed.
- Power on the server.
- Stop the array if it started automatically. If you see a message about retrying to unmount disk shares, disable Docker and/or VM services in Settings, reboot, and try again.
- Unassign the parity drive.
- Assign the new drive to the parity slot. You may receive error notifications - this is normal.
- Assign the old parity drive to the data slot of the drive being replaced. Both the parity and replacement data drives should now display blue status indicators.
- Go to Main > Array Operation. You should see a Copy button and a message stating "Copy will copy the parity information to the new parity disk."
- Confirm and start the copy process. Check the confirmation box and click Copy. The array will not be available during this operation.
- The copy process can take many hours, depending on disk size. When finished, the array will be stopped and ready for a data rebuild.
- Start the array to begin the data rebuild.
- Confirm your action if prompted. The array is now started, and data is reconstructed onto the new data drive.
- You can use the array during the rebuild, but for best performance, limit usage.
- The rebuild process will also take several hours.
Never format a drive during this process. Formatting will erase all data and update parity, making recovery impossible.
After completion, you will have a larger parity drive and a replaced data drive. Many users run a parity check afterward for extra confidence, though this is optional.
Removing disks
There may come a time when you want to remove a disk from your Unraid array. Whether you're looking to save on power, retire an old or unreliable drive, or repurpose hardware for a different use, the process is fairly straightforward.
Removing parity disks
If you find that you no longer need the level of parity protection in your setup, you can remove a parity disk whenever you want.
To remove a parity disk:
- Stop the array: Begin by accessing the WebGUI and stopping the array.
- Unassign the parity disk: Locate the parity disk slot and set it to "Unassigned."
- Start the array: Finally, restart the array to commit the changes and successfully remove the parity disk from the configuration.
Before you make any changes, please keep this in mind: If you already have any failed data drives in your array, removing a parity disk can decrease the number of failures Unraid can handle without risking data loss.
- With dual parity, you can recover from a single failed drive, but be aware that you won’t be able to survive another failure during the rebuild process.
- With single parity, you lose all redundancy, meaning that any additional drive failures could result in data loss.
Removing data disks
Removing a data disk is a straightforward process, but it’s important to remember that you'll need to perform a parity sync afterwards. Until this sync is complete, there's a risk of data loss if another disk fails.
You can choose from two methods to remove a data disk:
- Standard method - Recommended for most users.
- Parity-Preserve method - Suitable for advanced users who want to maintain parity during the removal.
- Standard method
- Parity-Preserve method (Advanced)
This method is ideal for users looking for a simple way to remove a data disk.
- Stop the array: Begin by stopping the array to safely remove the disk.
- (Optional) Document Your disk assignments: For your reference, you may want to take a screenshot of your current disk assignments from the Main tab.
- Reset the array configuration: Use the Reset the array configuration procedure. Be sure to choose the option to preserve all current assignments.
- Unassign the disk: Identify and unassign the disk you wish to remove.
- Start the array: After unassigning the disk, start the array again, but do not check the "Parity is valid" box.
Once you start the array, a parity sync will initiate if you have a parity disk assigned. Keep in mind that the array will be vulnerable to data loss until this sync completes.
Move any important data off the disk before removal. The parity sync process may take several hours, depending on disk size and system activity.
The parity-preserve method allows you to remove a data disk from your Unraid array without losing your parity protection. This process requires careful preparation and some technical knowledge and is only recommended for Advanced users.
What this method does:
This method effectively zeros out the data disk you want to remove, allowing you to keep your parity intact. Since a disk filled with zeroes does not affect parity, your array remains protected throughout the procedure.
When to use this method:
Use the parity-preserve method to remove a data disk while keeping your parity valid safely. This is especially useful to avoid a full parity sync after removal. Please ensure that the disk you're removing is healthy and empty.
Before you begin, ensure that you meet the following conditions:
- The disk you want to remove must be healthy, mounted, and empty.
- This method allows you to remove only one disk at a time.
- Note that there is no official support from LimeTech for this process; please proceed with caution.
This method will erase all data on the selected disk. Please verify that all files, including hidden files, are removed before proceeding.
To remove a disk using the parity-preserve method:
- Remove disk from shares: Ensure the disk is excluded from all shares, including global share settings.
- Start the array: Start the array with the disk assigned and mounted.
- Record array assignments: Note your array assignments, especially the parity drive, as a safety measure.
- (Optional) Enable Turbo Write: For faster zeroing, enable Reconstruct Write ("Turbo Write") in Settings → Disk Settings, but only if all drives are healthy.
- Ensure disk is empty: Check that the disk is completely empty. Reformatting the disk is a quick way to clear it, but confirm that no important data remains.
- Create a placeholder folder: On the disk, create a single folder named clear-me.
- Run the clearance script: Use the User Scripts plugin or run the following script from the command line:
- The script will only execute if the disk is empty and correctly prepared.
- Note that this process can take several hours depending on the disk size and system activity.
- Avoid accessing the disk while this process runs.
- Stop the array: Once the clearing is complete, stop the array.
- Reset array configuration: Retain all current assignments when resetting the array configuration.
- Unassign the disk: Unassign the disk you wish to remove, double-checking all assignments, especially the parity drive.
- Confirm parity status: Check the box indicating "Parity is already valid."
- Start the array again: Start the array to finish the removal process.
- (Optional) Verify parity: You can run a correcting parity check afterward to ensure parity integrity.
Alternative command-line method for zeroing a disk
If you're comfortable using the Linux command line, you can manually zero out your disk using the following instructions. Be sure to choose the command that corresponds with your version of Unraid.
For Unraid 6.12 or later:
- First, unmount the disk:
umount /mnt/diskX - Zero out the disk with the following command:
dd bs=1M if=/dev/zero of=/dev/mdXp1 status=progress
For Unraid 6.11 and earlier:
- Start by unmounting the disk:
umount /mnt/diskX - Next, use this command to zero out the disk:
dd bs=1M if=/dev/zero of=/dev/mdX status=progress
Remember to replace X with the specific number of the data disk you are removing.
Before executing these commands, double-check the drive number to avoid accidentally erasing data on the wrong disk.
Troubleshooting
-
If you encounter any issues with the commands, ensure that the disk is empty and only contains a folder named clear-me. The process will not proceed if there are additional files or folders present, including hidden ones.
-
For further assistance, don’t hesitate to reach out to the Unraid forums. There, you can find helpful resources and community support.
Checking array devices
Regularly checking your Unraid array is crucial for maintaining data integrity and identifying potential issues before they result in data loss. You can initiate a check using the Check button under Array Operations. Depending on your array’s configuration, this button allows you to conduct either a parity check or a read check.

For convenience, you can schedule these checks to run automatically at intervals that suit you by navigating to Settings → Scheduler. It’s advisable to perform automated, non-correcting checks on a monthly or quarterly basis to ensure the ongoing health of your data.
Parity & Read checks
- Parity checks
- Read checks
A parity check is essential when your array includes at least one assigned parity device. During this process, all data disks are read simultaneously. The system recalculates the parity and compares it to the information stored on your parity disk(s).
While a parity check is in progress, you can still use the array. However, be aware that performance may slow down due to drive contention, as both file operations and the check will compete for resources.
Normally, if the parity check identifies errors, Unraid will update the parity disk to align with the computed data and increment the Sync Errors counter.
If you prefer to run a check without making corrections, simply uncheck Write corrections to parity before starting. This way, errors will be reported but not fixed.
A correcting parity check is automatically initiated after an "Unsafe Shutdown" - this occurs when the array is restarted without being properly stopped. The most frequent cause of such an event is unexpected power loss, which can leave write operations incomplete. Using an uninterruptible power supply (UPS) is highly recommended to avoid this scenario. This measure helps maintain the integrity of your data and prevents potential issues.
What are parity errors?
Parity errors happen when the parity information your system calculates doesn't match what's stored on your parity disk. This mismatch can arise from several issues, including:
- Sudden power loss or unsafe shutdowns
- Failing drives or disk errors
- Problems with cables or connections
- Unclean shutdowns or unexpected system crashes
When parity errors occur, either the parity disk or the data disks could be out of sync. Ideally, a parity check should report zero errors so everything functions correctly.
What to do if you encounter parity errors
If your parity check reveals errors:
-
Investigate the problem: Start by checking SMART reports, which provide detailed information about your drives' health. Look for any signs of disk or connection problems.
-
Seek help from our forums: If you cannot resolve the issue on your own, consider reaching out for advice on the Unraid forums. The community can offer valuable insights and suggestions based on their experiences.
-
Run another check: After you've addressed any hardware issues, running another parity check is a good idea to ensure everything is back in order.
Remember that parity checks can take several hours, depending on the size of your disks and the activity level of your system. For the best results, schedule these checks during times of low system usage.
A read check is an important task you should perform under certain conditions to ensure the health of your storage array. This check is necessary if your array does not have any parity devices assigned or if you have more disabled drives than available parity drives.
During a read check, every sector of every disk in the array is examined. The goal is to verify that all data can be accessed and to identify any unrecoverable read errors.

Why read checks matter:
Read checks are essential for monitoring the health of your disks, especially in configurations without parity protection. If a disk encounters an unrecoverable read error during the check, the affected data cannot be retrieved, which could lead to data loss. Therefore, keeping an eye on the results of these checks is crucial, and taking action when errors are reported is necessary.
You can also review the history of read check operations in the Unraid interface, which helps you spot trends or recurring issues over time.
When to use a read check:
Consider running a read check in the following situations:
- No parity devices assigned: When your array lacks parity protection.
- Verifying disk integrity: To confirm the integrity of each disk without making any corrections.
- Post-hardware issue resolution: After fixing hardware issues, to ensure all disks are healthy.
What to do if errors are found:
If your read check reports errors, here are some steps to follow:
- Review SMART reports: Check the SMART reports for the affected disks to understand their health status.
- Inspect connections: Ensure that physical connections and cables are secure.
- Consider replacements: If a disk shows persistent errors, think about replacing it.
- Backup critical data: Move important data off any disks reporting errors as soon as possible to prevent data loss.
Without parity protection, any unrecoverable read error will lead to permanent data loss for the affected files or sectors.
To maintain the health of your disks, it’s wise to schedule regular read checks, especially if your array does not have parity protection. This proactive measure will help you catch potential issues early and safeguard your data.
Check history
Whenever the system performs a parity check or a read check, it keeps a record of what happened. You can view these details easily by clicking the History button found under Array Operations in the interface.
For those who want to dive deeper, all these records are saved in a text file located in the config directory on your Unraid USB flash device.
Spinning disks down or up
Unraid allows you to control the power states of your hard drives. You can easily spin them up or down, and manage SSDs to be active or in standby. This helps save energy, extend the life of your drives, and reduce noise when the disks are not being used.
Why spin down or up?
- Spin down: If you have drives that aren’t used often, spinning them down can save energy and help them last longer.
- Spin up: If you know you’ll need files soon, spinning up the disks ahead of time can cut down wait times.
How to control spin states
You’ll find buttons to spin the disks up or down in the WebGUI. Just click the button you need. Remember that if a disk is being accessed (like if you’re opening a file), it will stay active and ignore any spin-down request.
When a disk is spun down, its temperature won’t show in the WebGUI. However, once any application or user accesses it, it will automatically spin up.
Use the spin controls to save power and reduce wear on your drives. Remember that disks that are actively being used will stay on until all tasks are finished.
Reset the Array Configuration
Resetting your array configuration is an important step that should be undertaken carefully. This process is usually necessary when removing a disk, starting fresh with a new array layout, or fixing disk assignment issues. Please note that this action can impact data protection and parity, so ensure you only proceed when truly needed.
Common reasons to reset your array include:
- Removing or replacing disks: If you need to take out or swap out any disks in your array.
- Starting anew: When you're looking to create a brand new layout for your array.
- Fixing disk assignment errors: To correct any issues with how disks are currently assigned.
- Recovering from configuration problems: When facing challenges with your existing setup.
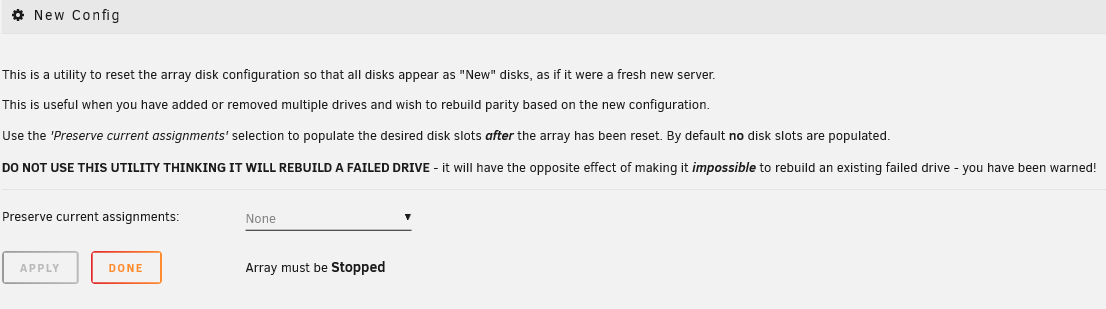
To reset your array configuration:
- Go to the Tools page: Start by navigating to the Tools page and click on New Config.
- Decide on disk assignments: You can keep some existing disk assignments if you only wish to make minor adjustments. This can save time and minimize the chance of errors.
- Confirm your choice: You must check a box to confirm your decision to reset, then click Apply.
- Head back to the Main tab: After applying the changes, your configuration will have been reset.
- Adjust your configuration: Make any necessary changes by assigning or unassigning disks as appropriate.
- Start your array: Launch the array in Normal or Maintenance mode to finalize your updates.
- Data preservation: Unraid will attempt to recognize previously used drives and preserve data where possible.
- Impact on parity: Removing a data drive will always invalidate parity unless that drive was zeroed before removal.
- Disk reordering: Changing the order of disks won’t affect parity1, but it can invalidate parity2.
When you see the Start button, there is a checkbox labeled "Parity is Valid." Only check this box if you are certain it is correct or if an experienced Unraid user has advised you to do so during recovery. Incorrectly checking this option can lead to data loss.
Undoing a reset
If you find that you need to reverse a reset:
- Access your flash device over the network (SMB).
- Locate and open the
configfolder. - Rename the file
super.oldtosuper.dat. - Refresh the Main page in your browser, and your prior array configuration should be restored.
Status reports
Unraid provides status reports that help you keep track of the health of your storage array. These reports are a quick way to check if any of your disks are disabled or having issues with reading or writing data.
-
Current status: Status reports show the current condition of your array. It's important to note that this information resets after you restart your system, so that it won’t keep a history of past issues.
-
No historical data: If you want to see what has happened before a reboot, you'll need to look elsewhere, as these reports don’t save past states.
Remember that the status reports don’t include SMART data. SMART reports give you a more detailed view of individual disk health. So, even if your status report shows everything is fine, checking the SMART reports regularly is still a good idea to catch any potential problems early.
Troubleshooting
Troubleshooting array start failures
If your array won’t start, follow these steps to identify and fix common problems. Look for error messages under Main > Array Operation.
- Missing disks
- Device limit
- License issues
- Key server connection
- Withdrawn release
Message: Too many wrong and/or missing disks!

With one parity drive, you can only have one missing disk. With two parity drives, two disks can be missing and you can still start the array, and so on. Parity helps until you can replace the missing disk.
What to Do: Replace the missing disk. For dual-parity configurations, replace the missing disks one at a time. If you can’t recover the data (or if more than 2 disks fail in a dual-parity setup), go to Tools > New Config to perform the New Config procedure.
Message: Too many attached devices. Please consider upgrading your registration key.

The rules for connecting storage apply only before starting the array. After the array is started, you can add more storage, including USB drives for virtual machines. However, be aware that Unraid currently only limits the number of attached storage devices on the Starter license tier
(6 device limit).
The maximum applies to all devices except the boot USB.
To resolve this error:
- Stop the array.
- Remove any unneeded storage devices.
- Start the array.
- Reconnect devices afterwards for Unassigned Devices use.
Message: Invalid or missing registration key.

A valid registration key is required in order to start the array. To purchase or get a trial key:
- Go to Tools > Registration.
- Click Get Trial Key or Purchase Key.
- Install the key by returning to Registration, pasting in the field, and clicking the Install Key button.
-
Trial License: Full Unraid access for 30 days, just like the higher license tiers. You can use unlimited storage devices, but you'll need an internet connection to start it up. Start a new trial here.
-
Paid License: This is yours to keep forever! However, there are limits on the number of devices based on the plan you choose (Starter, Unleased, or Lifetime). After you activate it, you don’t have to connect to the internet anymore.
If you see an "invalid key" error, it might mean your trial has expired. To keep using Unraid, you can purchase a license here.
If your server is online and your trial hasn’t run out, your USB flash drive might have a GUID that can’t register a key. This can happen if the GUID isn’t unique or has already registered by someone else. Using an SD card reader via USB can also cause this issue since it often has a generic GUID. If your USB flash drive is blacklisted, it can't be used anymore, and you'll need to find a different device for your Unraid Server OS installation.
Message: Cannot contact key-server
If you have a Trial license, you'll see a message indicating that you need to contact the Unraid license server to start your array. However, if you have a paid license, you can start the array without any extra steps.
For Trial users, your server tries to connect to the license key server to check your license when it first boots up. If it can't connect within 30 seconds, the array won't start. But don’t worry! Each time you refresh or navigate the WebGUI, it will try again to validate your license quickly. Once it successfully validates, your server won’t need to check again unless you reboot.
Message: This Unraid release has been withdrawn.
If you see this message, it means you're using a beta or release candidate version of Unraid that isn't enabled for regular use. To resolve this:
- Open Unraid.
- Go to Tools > Update OS.
- Install the latest stable version.
Once the update is complete, restart your server to start your array.
Disk failure during a rebuild
If a second disk fails while you're rebuilding another one, what you can do will depend on your parity setup.
-
Single parity disk:
- If one disk fails during the rebuild of another, the rebuild will stop because the data can't be accurately restored. Unfortunately, you won't be able to recover your data in this situation.
-
Dual parity disks:
- If you have two parity disks, you have more options:
- You can wait for the first rebuild to finish and then deal with the second failed disk.
- Or, you can stop the current rebuild, replace the second failed disk, and then start the array to rebuild both disks at the same time.
- If the first rebuild is almost done, it’s usually better to let it finish. If it just started, it might be faster to rebuild both together.
- If you have two parity disks, you have more options:
Rebuilding disks puts a lot of stress on all drives, which increases the chance of new failures. Always check drive health using SMART reports before starting a rebuild.
Be prepared for the rebuild process to take several hours. The time can vary based on disk size and how busy your system is. Larger disks and busy systems may take longer.